Guest Post: Top 5 Summer Hairstyles

Today’s final, and wonderful guest post comes from freelance blogger Brooke Samsonite (she blogs here, and tweets here). She will be sharing her take on the top 5 latest fashionable Summer hairstyles for you to re-create – enjoy!

———————————————-
Top 5 Summer Hairstyles
At the peak of the summer season, we’re seeing several hair styles that are making waves—literally.
In most cases, it’s not surprising to see where some of these trends got their starts, but like them or love them they’re the hot hairstyles of summer 2012.
If you’re looking for a new style or just wondering where your current style fits in with today’s fashion, we’ve got you covered. Without further ado, here are this year’s top five summer hairstyles:
1. Side braid

A lot of celebrities are opting for various renditions of the side braid, from fishtail braids to loose, flowy wraps. Loose side braids are easy to accomplish and look better with a lot of body. Volumizers, mousse and setting your hair with rollers first can help achieve this. Fishtail braids are a little difficult to achieve (tutorial here), so they may take practice to get the right look, but their summertime appeal is off the charts.
2. Side chignon

A popular hairstyle for brides, the side chignon has a relaxed, yet elegant, appearance. But this isn’t a wedding-specific hairstyle. There are plenty of settings where the side chignon can come off beautifully. It works for holiday parties, nights out and can even be a quick-fix when you’re in a hurry. And getting the look is simple enough that virtually anyone can put it up and pull it off.
3. Ballerina bun

Dream of being a Bunhead? You’re not alone. Part of ABC Family’s summer lineup is “Bunheads,” a popular television show about the ballerina life. Whether duplicating the show’s hairstyle is intentional, girls are donning the ballerina bun. To get the look, many girls use a hair donut accessory (buy one here) to get a tight, even wrap on their bun, which can be secured into place with bobby pins.
4. Beachy waves

Does long, wavy hair ever go out of style? Not on the beach, and certainly not in the summer. Blonde highlights are a staple color pop for beachy waves, but this hairstyle looks great with any hair color.
5. Shades of red

If you’re up for trying a bold hair makeover, try going with red. But before taking the plunge, make sure you get the right color for your skin tone and are diligent about maintaining red hair. You can’t lose, because if you don’t like your color choice, you can always dye it again.
This list doesn’t imply that creativity has no place when it comes to your personal style. But if you’ve been searching for some direction to bring your hair up to speed with the season and the trends, you should be set for a little experimentation and a lot of summer fun.

Sources; 1, 2, 3, 4, 5 

Guest Post: Make your own body lotion

The lovely ‘Bokusouchi‘ has been kind enough to guest post for me whilst I am away.
She wanted to bring you all a DIY Beauty Tutorial, and after deliberation decided that she would show you one of her tried and tested favourites. Here is ‘How to make your own body lotion‘.

—————————————–

What you’ll need:

1) Unrefined solid coconut oil (you can get this online or in a health food shop)
2) 1 ounce of beeswax (it normally comes in 1 ounce bars, I got 2 for £1 on ebay)
3) An essential oil of your choice (I went for sweet orange)
4) A medium sized pan
5) A sterilised pot/jar (I sterilised an old mayo jar)
6) Something to mix it with that you can throw away, like an old chopstick etc. 
If you don’t have that use the handle of a mental spoon/fork etc.

Boil your kettle. While your waiting, pop your beeswax into the jar and top it up with coconut oil, like so

Once your kettle has boiled pour the hot water into your pan and put the jar in. 
You want the water to be roughly half way up the jar. 
Make sure you put the ingredients into the jar before you put it into the pan, if not your jar will tip.
Put the heat on to about medium.

Keep it on the heat until it completely melts.
It will go a funny yellow colour but don’t worry that’s supposed to happen!
Then take it out (watch your fingers, it’s going to be hot!), it should look like this.
Now time to give it a stir and add your oil! You’ll only need a few drops, trust me.
…….and that’s you done!
If you find that it’s a bit too hard you can melt it down using the same method and add more coconut oil, too soft beeswax.

I loved this body lotion but prefer it as a night time one as it’s a bit heavier than the ones I’m used too. 
I’ve found it’s an AMAZING overnight foot treatment too, just load it on and pop some socks on. 
You’ll wake up with baby soft tootsies!

Discuss; Puffy Eye-bag Trend

Getting rid of puffy and noticeable bags under the eyes is something that most women battle with in their daily make-up routine. So when I saw a recent make-up tutorial in Popteen that was specifically to achieve puffy eye bags I was slightly taken aback.

click to enlarge
The idea behind it is to create a smiley, innocent looking face.
What do you think? Will you be re-creating this look?

I personally like the idea, it’s very wholesome and sweet…however I do wonder if maybe just smiling more would work better. I don’t think I will be trying this, but I’d be interested to see others who have.

Trend Alert: Wavy Hair

You may have noticed it in your favourite magazine/on your favourite model; wavy hair is big right now. Think along the lines of surfer/boho chic, come blogger style meets the 90’s crimp-craze and you got it!

Edge Style
But don’t be mistaken in thinking that it’s limited to particular styles. Gal Models from Popteen to Happie Nuts are workin’ the wavy look. It may have started off slow, but Gal power-figures such as Momoko Ogihara & Romihi have shown that it certainly has staying power. 

Romihi
Aina

How can you recreate it? When I tried out loose waves, I used only a hair iron which can actually be incredibly effective. You can also create a similar effect with a curling iron of course, but be careful not to tread into curl territory and keep it wavy. Plaiting/Putting your hair in buns overnight is also a possibility. 

Murua will soon be offering a special in-store novelty (see above picture) for their customers when they spend over 21,000円 (around £150); 3 barrelled iron – the kind that Momoko uses on her gorgeous locks, and has also been featured in various Gal mags. 
Jelly

Popteen

Ageha

Popteen have also gone wave crazy, and included some great tutorials on how to re-create the perfect wave look for all different kinds of gal, in this months issue.

Will it last into A/W? I’m not sure. Personally I thought this would have died by now, as Autumn drew closer, but it seems to only be getting stronger. Of course as the colder weather hits, curls will be more do-able and maybe this kind of wavy hair is at its peak and will fade away soon, but for now and until I hear otherwise I’ll certainly be enjoying it

Mode hair & Skin care….

Mode Hair
If you haven’t heard about the current MODE trend in Gal, then check out Mitsu’s amazing introduction, or pick up the current issue of Happie Nuts which features Emoda’s Ena Matsumoto.
I really love the look and idea of Mode, because it’s a more sophisticated and stylish kind of Gal without being too boring or old – even if Mode is aimed at the older Gal. By this I mean that whilst chic is always great, I don’t want to look like I’m going to the office (blouses and pencil skirts etc.) or too old for my time whilst I’m still a university student.
Anyway, Mitsu also posted a wonderful hair tutorial to Ena’s Mode style bun. I loved the look of it and thought it could be a more stylised alternative to my usual messy top bun. When I mentioned this she said how she would like to see my version as my hair is the polar opposite to hers – long and thin.
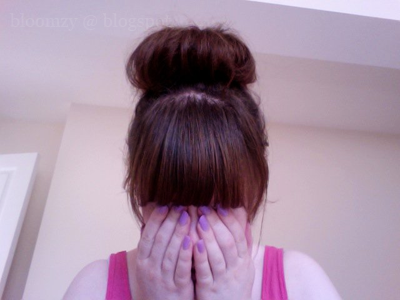
Please excuse the bad webcam pics. I didn’t have any make-up on so I didn’t want to show my ugly half-awake/half-asleep face.

An example of the length of my hair/how thin my hair is.
I was really shocked when I put my hair up into the ponytail because it was so thin. I thought it was getting thicker, but I guess it’s going to take longer D:

My take on the ‘Mode bun’
I should mention that this was rather rushed. It took me about 20mins and I did it as soon as I had woken up. This was because of an impromptu visit to the beach so I was in a bit of a rush to get everything together and get ready. However no more excuses, I plan to have another go next time I want to carry off the Mode look.
I found it very hard to get this style right as my hair is so thin and long.
I found rolling my hair under to be slightly challenging as it was so long, but I managed.
My second dilemma was down to how thin my hair was. Even after back-combing I found that my hair could have been thicker to make it work better. This was probably because it didn’t really have the volume/thickness that Ena and Mitsu managed. Maybe this was due to my lack of time or maybe this style just isn’t meant for those with thin hair. Even so I do want to try it again – maybe using a thickening shampoo just before – as I really liked the overall look of it. I felt as though I looked more like my age, then when I do a messy top bun…don’t ask me how that makes any sense but I have trouble with people always thinking I’m younger than I am haha
I thought my version was too messy to start with, but then I saw the original picture of Ena and I didn’t feel so bad because it seemed that was the look she was going for, albeit with a more sleek outfit than mine ;D
So this style, whilst difficult, is still a winner for me.
Skin Care

In the last few weeks leading up to the end of last term (at uni) I found myself going out to lots of restaurants, comedy clubs (eating food such as nachos etc.) and takeaways with friends. Whilst I enjoyed this immensely I am now suffering from the consequences. My skin and body are at a low. The weight/toning-up post will come later but for now I want to talk about skin.
Thanks to the wonders of the female body (hello PMS) and too much junk food, my skin broke out. This probably isn’t a big deal for most people, but my skin has always been relatively spot free and smooth. So you can understand that this got me down a little bit. Therefore I started eating healthier and I tried out a few skin care products to battle the blemish.
Please note that I have sensitive skin so I don’t usually use spot fighting scrubs/facial moisturisers.
1. Deep Action Facial Scrub – I usually buy this as it is really effective. It can be used as a daily wash or as a mask. But for some reason the bottles always tend to break on me. I wanted to buy it again this time but they didn’t have any so I went for…
2. Tea Tree & Peppermint Cleanser/Toner – I have used Tea Tree before and I know it can have brilliant effects on your hair but I haven’t used it on my skin before. Unfortunately this just made my skin break out even more. I don’t know if this was because my skin disagreed with the product or if it would have done it anyway. I stopped using it as I didn’t find it any help at all D:
3. Deep Action Daily Exfoliating Wash – I thought this may have been the first product I know and love, but re branded so I bought it…but it wasn’t. It had a different feel to it and I couldn’t use it as a mask like the first one. However it did start to clear my skin up, but after using it daily – as it is supposed to be used – I found my skin drying up, and not just a little bit. It caused my skin to flake and it left my face feeling rough and dry. Definitely the worst out of the two.
4. Savlon – What? An antiseptic cream?! It may sound ridiculous but when I told my boyfriends mum how I had dry skin and spots she recommended me this – if anyone is interested she did also give me some Clinique moisturiser but it didn’t work anywhere near as good as this. I never knew you could use it for spots but apparently you can (the website mentions it too), and it works wonders. The majority of the blemishes are gone and my skin feels normal again.
It really makes me wonder why I spend all my money on skin care products when something so simple and universal can help. As you can see I like Superdrug’s range of skin products but after this I think I will either stick to the Savlon when I have a break-out or choose something more natural like The Body Shop’s products.
Do you have any odd cures for blemishes or strange skin care routines?

Mini-update….

Candydoll
Candydoll x Tsubasa are releasing a new product.
This time it is Lamè Glitter, in two shades: Champagne & Rainbow – the glitter isn’t only for your face either. Candydoll says that you can use it for body, hair and nails.
I like the concept behind the advertising for the glitter, but am I the only one who thinks that Tsu-chan looks a little off in the Rainbow photoshoot?
Anyways, if you order before 6pm on the 23rd April you can get free shipping – This is of course only for Japan, but it’s still a good offer even if you’re using a shopping service.
Tsu is wearing Dollywink #1 top lashes, #5 bottom lashes
Well Tsubasa has updated her blog again, showing it off.
I’ll let you make your own decisions, but I personally think it would better suit someone who isn’t as pale.
Tsubasa also gives out instructions on how to use Candydoll blushers/highlighters for that perfect Spring look:
  1. Use a large brush and quickly apply a sweep of Peach Pink (top left).
  2. Then use a small brush and apply Strawberry Pink (centre).
  3. Use the purple highlighter (top right) gently against the inside of the cheek.
  4. Then use the Cream Beige (bottom left) to sweep a thin line down the centre of the nose.
Also, if you’re a fan of collection everything Tsubasa/Candydoll – there is a limited release orange and white stripe cased powder…just incase you didn’t like the original black and white ;D
Source; 1, 2

FHF & Hair Tutorial Scans….

Fashion Hime Friday
A big thank you to Sara Mari, who featured me on this weeks ‘Fashion Hime Friday‘.
I’m sure you all know about Sara’s amazing blog already, but if you don’t then definitely check it out.
Hair Tutorial Scans
I was looking through some scans from April’s issue of AGEHA and I saw some pretty simple, but cute hair tutorials. I plan on trying a few of these out, and maybe posting the images up here soon – if I don’t fail at it completely ;D
So simple and very cute – Looks easy enough for us Gals with thin hair too.
Perfect for this seasons Mori Gal look.
Another simple but effective look.
This last scan is actually from JELLY, but it shows off some of this seasons must-have hair accessories, such as: braid (it doesn’t have to be your own hair)/headband, the scarf, can-can hat. I personally love all 3 of these looks because you can work them into almost all of this season’s trends.
The scarf, and the can-can hat are great for this season’s western trend:
But don’t forget, the scarf is also a great all-round accessory for most of this seasons looks. And a can-can hat is the perfect accent for any feminine coordinate.
And the braid/headband is a great alternative to using your own hair, as seen on the cover of the May issue of JELLY:
Will you be trying out any of these styles this season?
Or wearing any of these accessories?

Remember: If you have any questions about me/the blog or ideas about what you’d like to see on the blog, leave a comment here.

Source; 1, 2, 3