Tutorial: Velvet Nail Manicure

How to create an on-trend velvet nail manicure

The last nail tutorial I posted seemed quite successful so I thought I would do another. This time I picked this season’s on-trend velvet nail manicure – made popular on the catwalk. Once again I’m going for the accent nail as I didn’t want to over do it. So here is a simple and easy tutorial for a velvet manicure.
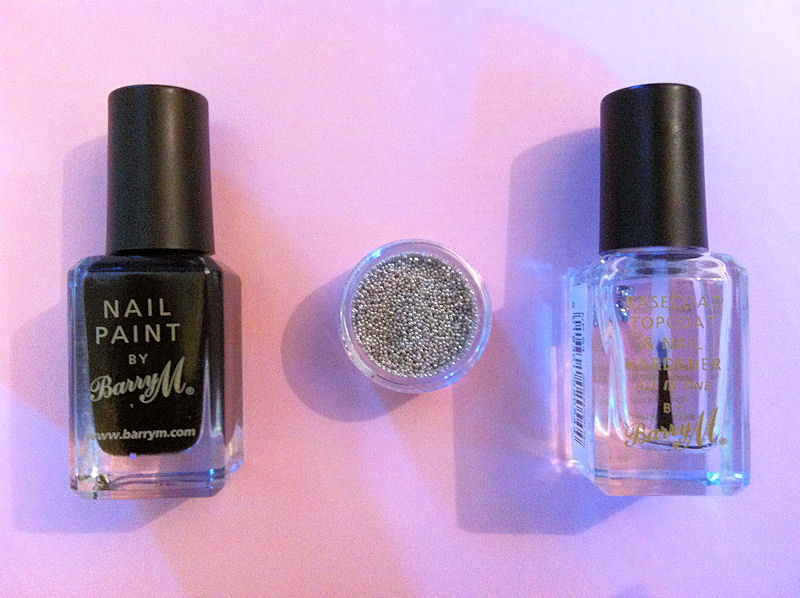
You will need…
1 x Brush
1 x Tweezers
1 x Base Coat (optional)
1 x Nail Polish (in your choice of colour)
1 x Pot of  ‘Velvet’ Powder (in your choice of colour)

How to create the look:
1. If you’ve chosen to use a base coat, apply it to your nails.
2. Take your chosen nail polish and apply a coat to your nails – wait til dry.
3. Take the ‘velvet’ powder and use the tweezers to mix and separate the powder.
4. Apply another coat of polish on your chosen nails and then shake the powder onto the nails.
4. Leave the powder to set and the polish to dry, then use the brush to brush off any excess powder.
5. A top coat is not needed as it would ruin the effect, and the powder will stay on without it.

And that’s it! As always these are just simple, easy steps that you can use as a guideline when creating this effect. You can always mix it up a bit – maybe do all your nails or even try and create a design with the powder. I would recommend laying down some paper to catch the excess powder – it also makes it easier to put back after. Don’t worry if you get it wet, it may look soggy and ruined but after a quick dry it’s back to normal. This is a very subtle type of nail art, especially in such a dark colour, but I really like it.

The nail polish I am wearing is Natural Collection’s ‘Cosmic Crush’, and the Velvet Flocking Powder* was provided by Born Pretty Store – the tweezers and brush are included with all sales of the (separate) powder.

You can buy the nail polish in Boots and the Powder here (use code: BLOOMZYK31 for 10% discount).

MAC Marilyn Monroe Collection

Recently I don’t find myself posting too often about new beauty product releases.
I think it’s mainly because I don’t get too excited about products that often, and I don’t want to post something that a ton of other beauty bloggers have done – or at least I try not to. So you know I am excited about a collection if I blog about it.
MAC is a great beauty brand, but I’m never really wowed by their collections.
That has changed though with their new Marilyn Monroe Collection, which is released this month.
You can probably guess what it was that drew me to this one in particular – yep, the red lipstick!
I also love the selection of products in this collection, not three or four products but a wide variety – in various shades.
I can see myself dropping a lot of money on this collection – I pretty much want everything!
The collection includes:
Beauty powder, blushers, brow finishers/markers, kohl pencils, mascara, eye shadows, 
eyelashes, lip liners, lipsticks, dazzleglass and nail polishes.
The Collection is released in October 2012 and will be available in-store and online.
Source; 1

Tutorial: Studded Nail Art Design

How to create a simple studded nail art design

I love nail art but my patience is as long as my skills are good.
Therefore I tend to stick to simple, but effective designs and my favourite way to do this is with an ‘accent nail’.
An accent nail can be one or more nails that stand out from the rest to give your nails that extra bit of glam.
I tend to do one or two, but with this design I felt that less was more. 
So here is a simple & easy tutorial for a studded nail design:
What you will need:
1 x Base & Top Coat
1 x Nail Polish (in your choice of colour)
1 x Container of Micro-beads (in your choice of colour)

How to create the look:
1. Paint your nails with a base coat, your chosen colour and a top coat.
2. Pick your colour of Micro-beads and take a few out of the container.
3. Use the brush of your ‘top coat’ to pick up one of the Micro-beads
4. Place the beads on your finger nail in a random design.
5. Once the beads have been put in place, place a top coat over the nail.
And that’s it!
Of course you can use a separate tool for placing the beads on but I was trying to keep the tutorial simple, with items that most people have or are easily accessible. You could also do it on all of the nails, which I think looks great. 
An edgy design that doesn’t take long to create and still looks chic, and as if you spent a lot of time on your nails.
The nail polish I am wearing is Essie in Stone, and the Micro-beads were provided by Born Pretty Store*.
You can buy the nail polish here and the Micro-beads here (use code: BLOOMZYK31 for 10% discount).

Introducing: Shopcade

A preview of my Shopcade page
Shopcade is a new way to keep track of the things you love and the items you want to buy.
As you all know I am a wishlist addict. I love compiling them and sharing them with everyone else.
So it’s only natural for me that Shopcade is a site that is not only fun but essential for me when I’m online.
Shopcade is a social shopping application that allows you to share the items you’re buying or just want to buy.
You have your own personal page where you can add products and lists of items to show off to your friends and the Shopcade community. If you have ever seen a photo of an item online and wondered where it’s from and how you can buy it – Shopcade is your saviour! You can click through the product and be taken directly to the brands page where you can buy the item and earn points (& cash!) on Shopcade. You can also just earn points by adding products to your page. Once you have a certain amount you can use your points to get free gifts or vouchers. I used my points to get myself some new business cards and I’m currently saving the rest for a big prize!
I personally was drawn to Shopcade through the product sharing/list creating, and by the idea that you can then buy the item you just re-blogged/pinned. Earning points and cash whilst doing this is just an extra perk for me really. 
I also don’t feel any pressure to buy items – I can just enjoy sharing products and making my page pretty.
Add me on Shopcade here, and check out my Shopcade feature here.
Please ignore the name, it’s old and is in the process of being changed.

Nail Polish Haul: Essie & Models Own

Models Own and Essie Nail Polishes

Ok, I may have gone a little overboard. I can’t help it, I’m addicted to nail polishes!
It’s true, nail polishes are the one thing I will always want, and pretty much always buy.
Luckily I’m not restricted in what I can wear on my nails (by a job etc) so I tend to change them often.
That also means that I like to have a large selection of colours, and trust me, I do – one day I’ll show you them all.
Essie and Models Own are two nail polish brands well known for their selection of colours and quality.
I’ve actually only tried out a couple of Essie polishes, but now I’m happy to own quite a few.
The shades are quite simple, and grown up, wouldn’t you agree? That’s where the Models Own polishes come in. The Models Own ones are just to hold me over until I can get my hands on the Beetlejuice & Mirrorball collections, but I thought they were also a bit of fun. The photo doesn’t do them justice but they have a great glittery sheen to them.
Guys…I think I’m a Nail Polish-holic!
When I got them home I decided that actually I wasn’t too keen on two of the Essie colours,
so I’m selling them on eBay here.

Style: 1 Skirt 4 Ways

Click image to enlarge
As soon as I pick up a potential clothing purchase I automatically start contemplating outfits.
A few days ago I bought a new waterfall skirt (it sounds dreamier than dip-hem), and that’s what I did.
It’s no wonder I’m such a fan of things like Polyvore and putting together coordinates in photoshop.
Therefore today’s post is a little bit of fun for me and hopefully helpful to a few people also.
I put together 4 separate outfits, all using the same skirt as the central piece.
My style varies a lot between trends and fashion ‘labels’ and I think that’s reflected here.
I managed to add a few Baroque pieces, and the outfits range from casual to slightly more formal.
I also wanted to think a little bit about accessories, make-up and nails – as I know I dress those to match.
I think the outfits themselves though are pretty self-explanatory so I won’t ramble on too much.
The skirt featured is from Topshop, and the items included are from various other High Street stores.
Please comment if you’d like to know where any of the items are from.
‘1 ___ 4 Ways’ is something I’d like to continue with.
Would you guys like to see more of this kind of post?

[Nail Week] My Favourite Nail Polish Brands

Nail Week is coming to a close, and I decided to end it with a post on my favourite Nail Polish Brands.
Over the years I have tried various brands of polish. Some I’ve not been too keen on, others I’ve become a long-term fan of, and still continue to use today. So I decided to include some of my old favourites and some of the up-and-comers in my personal collection.Why have I chosen the brands that I did?

Maxfactor
A mid-range priced polish that offers great coverage and good colour.
Great application – opaque in 1 coat!
Buy here.

OPI
Such an amazing range of colours, shades and glitter polishes.
If you want a particular colour, OPI will have it.
Buy here.

MUA
Cheap and cheerful.
Polishes start at £1 and come in a variety of shades, including glitters.
Buy here.

Chanel
A high-end polish that doesn’t disappoint.
Application and removal is super easy, whilst the shades are always on-trend.
Buy here.

Barry M
Affordable, vibrant colours that are long-lasting.
They often have discounts and special offers for their large variety of polishes.
Buy here.

Dear Lee
Wonderful colours and cheap too!
I love their selection and the application of the polish.
Buy here.

Miss Sporty
Another cheap, but effective polish.
Buy here.

So there you have it, my favourite go-to nail polish brands.
Of course that doesn’t mean I won’t be experimenting with any new brands.
What’s your favourite nail polish brand?