Photo Diary: Tatty Devine Sugar Skull Workshop


Last weekend a very good friend came down to visit me in my new pad.
We’d already made plans to visit the Rekorderlig event on the Friday, but we also needed to fill up our Saturday.
It so happens that I follow Tatty Devine on Twitter (big fan, as you know) and they mentioned a workshop they were holding to make and design your own Sugar Skull necklace, much like the ones they had on sale this Summer. You probably remember how much I wanted one of their Sugar Skull necklaces, but actually I didn’t end up buying one as I was too busy saving for the big move to London. So this was the perfect opportunity for me to make my very own unique Tatty Devine necklace! After some persuasion from my friend – he wanted to make one too – we decided to go.
The workshop itself is quite small so the event only had around 11 people (2 being TD staff members).
My friend was the only guy there, but the ladies loved him, and we all had a lovely time. Everyone was super chatty and very friendly – I think the atmosphere in Tatty Devine helped, it was very welcoming and laid back. We got to play with spray paints, stencils, crystals and a whole manner of shiny & sparkly objects. Everyone’s design was completely unique and it was fun comparing them along the way. Some went for shockingly pink, Barbie inspired skulls, others went for ALL the bling, while I finally decided on a dark gothic inspired sugar skull – it was that or purple.
My final design is the one on the left and the one on the right is my friend’s.
I had a brilliant time and met some lovely people. The TD staff were wonderful – funny, helpful and kind.
If you get the chance to attend one of their workshops please do! The experience alone is worth the money.
Spaces sell out very quickly though so keep an eye out (here) and book as soon as you can!

Tutorial: Studded Nail Art Design

How to create a simple studded nail art design

I love nail art but my patience is as long as my skills are good.
Therefore I tend to stick to simple, but effective designs and my favourite way to do this is with an ‘accent nail’.
An accent nail can be one or more nails that stand out from the rest to give your nails that extra bit of glam.
I tend to do one or two, but with this design I felt that less was more. 
So here is a simple & easy tutorial for a studded nail design:
What you will need:
1 x Base & Top Coat
1 x Nail Polish (in your choice of colour)
1 x Container of Micro-beads (in your choice of colour)

How to create the look:
1. Paint your nails with a base coat, your chosen colour and a top coat.
2. Pick your colour of Micro-beads and take a few out of the container.
3. Use the brush of your ‘top coat’ to pick up one of the Micro-beads
4. Place the beads on your finger nail in a random design.
5. Once the beads have been put in place, place a top coat over the nail.
And that’s it!
Of course you can use a separate tool for placing the beads on but I was trying to keep the tutorial simple, with items that most people have or are easily accessible. You could also do it on all of the nails, which I think looks great. 
An edgy design that doesn’t take long to create and still looks chic, and as if you spent a lot of time on your nails.
The nail polish I am wearing is Essie in Stone, and the Micro-beads were provided by Born Pretty Store*.
You can buy the nail polish here and the Micro-beads here (use code: BLOOMZYK31 for 10% discount).

プリクラ for your phone!

My own personal ‘purikura’
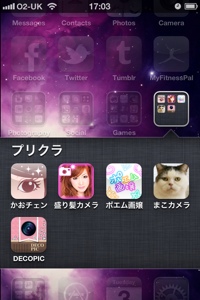
プリクラ (purikura) is the name given to the photo-booths and pictures well known and loved in Japan. Why are they so popular? Purikura machines allow you to take a variety of pictures with different backdrops and lighting, afterwards you are given the chance to decorate the final photos.
As they gain popularity worldwide (they’re in a city near you!) mobile app stores have seen an increase in the amount of ‘purikura apps’.
Here is a small review of my current favourite purikura app; DecoPic
Click ‘read more’ for the full post.

I’m not a fan of a lot of the purikura apps on the app store as I find they’re all pretty similar, but DecoPic intrigued me as the stamps, frames etc are very close to the ones used in the machines in Japan.

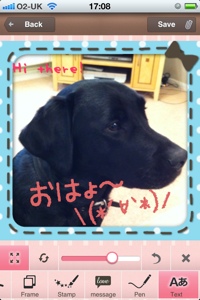
Once you have chosen to take a picture or use one from your album (awww look at my cute puppy), you can move and scale it to your needs. Then you have the option of adding lots of pretty, sparkly things.

Options include:

Art filters – much like instagram etc.
Not something you would find on a regular purikura machine. Obviously an addition that is aimed at the current ‘filter’ trend hitting the app stores.

Frames – a varied and not bad selection.

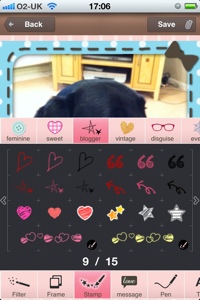
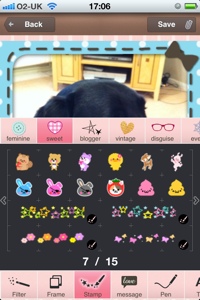
Stamps – 15 pages worth, all of which are just like the stamps you find on the machines in Japan.

Message – add messages such as ‘Today’s coordinate’ & ‘I love you’.

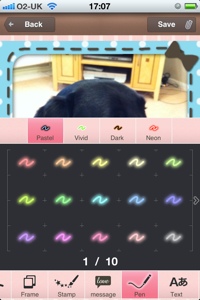
Pen – various colours/styles of pen to write by freehand.
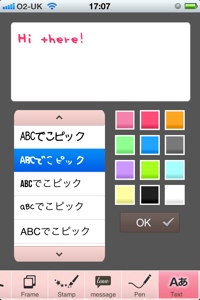
Text – various styles and a selection of colours to write by text.

When adding a message, stamp, text etc. there is the option of: resizing, rotating, moving and undoing the item. 
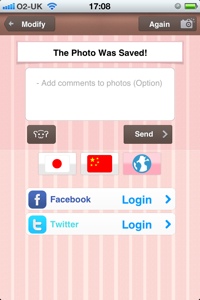
Finally, when you click ‘save’ the photo is automatically stored in your photo album and you have the option of sharing it with the community, or Facebook/Twitter etc.
I like the categories they have used for the stamps, messages and borders (feminine, blogger, vintage and more) – giving you the chance to pick your item depending on your mood/the feeling of the photo. There is also an ‘event’ category, which changes throughout the year.
With over 300 design options, if you want an app to decorate your photos with that is easy-to-use, authentic to the machines and FREE, then this is the one for you!

Want your own personal purikura photobooth on your iPhone/Android?


If anyone knows if it is on any other app stores please let me know.

Discuss: Gal influence in ASOS?!

ASOS featured an editorial with nail art by Sophy Robson in this months magazine. The most interesting design which I wanted to start a discussion about were these…

All-out Gaga and influenced by steam punk and Japanese Gyaru…」
It’s definitely interesting to see gal mentioned in mainstream fashion editorials, and of course we all know that nail art is a big part of gal. Maybe she enjoys the 3d aspects of gal nails – check out the cute, diamante bow – or maybe it was the ‘stiletto-point shape’?!
My question though is do YOU see the gal influence? 

Source; 1

Review: BK Nail Polish & Nail Foils

 This post is sponsored by born pretty
Recently, bornprettystore sponsored me with some of their new matt nail polishes and their new nail foils. I don’t actually own any matt polishes/foils so I was pleased to try these out and add them to my collection…

The two colours together~
One of the best things about this polish is that it dries super quickly!
The white went on especially well and gave such a great colour. I was in love with it as soon as I had applied it. The maroon was also nice, but not really my kind of shade – oh well, you gotta take a chance.
With some decoration.
I think this shows the colour off well.
Nail foils are popping up everywhere and can be bought in stores and online. However they can be rather pricey but bornpretty have managed to offer a great set of foils for a very cheap price.
They’re simply stickers in various colours and designs which you can attach to your nails (be them real, or fake) as a whole or as part of a design…
My first attempt~


The foils were difficult to cut-out and put on to start with, but after the first few I got the hang of it. I didn’t want to go for a full nail, instead I opted for a design. I don’t think I did too bad, no?
If you can cut it out of the foils you can put it on your nails!!
The foils lasted about a week (due to washing hands etc.) and the polish almost two with minimal chipping!! I was really impressed by the quality and life of the two products, and would certainly buy more of the polishes! As for the foils, they’re not exactly for everyday use as I change my nails often – therefore a pack would last me for quite a while.
Want to order some of these or more?!
Then visit born pretty store now!!
Worldwide shipping is available!
Born Pretty also offer wholesale prices on all their products and if you spend over $200, EMS shipping is free!! 

Review: Bornprettystore Nail tips

This post is sponsored by born pretty 
When Born Pretty contacted me about a sponsorship I was so pleased to receive something from a nail art & nail products store. I really do love doing different things with my nails and since I can’t always afford gels or acrylics I enjoy experimenting with my own. 
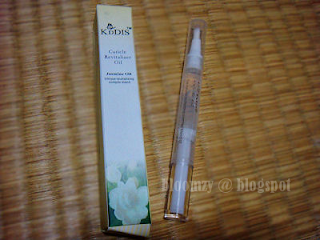
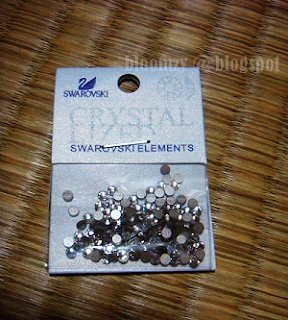
Born Pretty offer everything from nail polish to uv lamps and much more! I choose a simple selection of a few different products; false nail tips, wooden stick nail art tool, nail glue, cuticle oil AND Swarovski crystals.

Onto the first product…

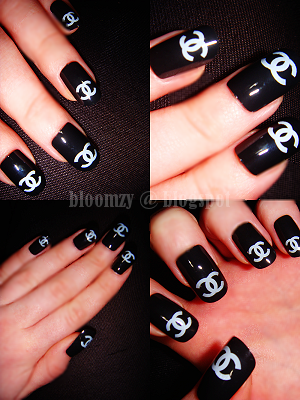
These were recommended to me by the store owner – I think they understand my interests pretty well. Chanel is a logo that pops up on a lot of Gal nail art so I was excited to try these out. As you can see I wore a full set at once, however I am already planning on mixing it up and wearing a few tips only with other nail designs.

I think they looked simple but effective. They would work with most outfits and styles, from Murua to Cecil McBee – the Chanel logo and a simple black nail is something that won’t go out of fashion.

The wooden sticks (more commonly used in manicures for cuticles) I choose because I was interested in doing some nail designs – plus they would also be useful in the future when I used the Swarovski crystals to decorate. They may not seem like a big deal but they’re so helpful and a must have for anyone starting out with nail art or needing supplies.

In the picture above you can see that I did a simple polka-dot & stripe design. The wooden tips were simple and easy to use and helped me create an effect I wouldn’t have been able to do with just a brush. I am also planning on doing a Sakura design soon with the same colours and of course, I shall be using the sticks!

Everyone knows it’s important to look after your nails, especially when you’re often getting acrylics, using tips etc. I love products like this so I jumped at the chance to try it. There are also a variety of types to choose from inc: apple, strawberry, rose, aloe vera, peach and more! 
I choose the Jasmine one, although it was difficult as I was so tempted by the full set (beauty products, especially sets, are one of my weaknesses). The pen is very simple to use, you just twist the end until the oil comes out and then you massage it into your cuticles. I am quite forgetful so I haven’t used it the recommended 3-5 times a week, however I have still noticed that my cuticles are a lot softer. I mainly noticed around an hour after I had applied it – they looked and felt a lot better.

I have yet to use the Swarovski crystals, but I have planned some nail designs already which I shall blog about soon, with a link back to this post, once I have done them. The great thing about these crystals is that you can also use them in your deco designs too! I know a lot of my readers and fellow Gal fashion bloggers also love deco and it’s just over $7 for 144 pieces – bargain!

As for the nail glue, I think it’s pretty obvious what that’s for. The store actually offers a variety of nail glues (inc. stickers for tips) but I choose the cheapest and it was pretty effective. I didn’t have any problem with the nail tips falling off. The only problem was it was a little hard to remove the residue from my own nails afterwards but that’s expected.

Want to order some of these items or more?!
Visit born pretty store and quote ‘BloomzyK31’ for a 10% discount!!
Yep, the lovely people at born pretty have offered my readers a special 10% discount which is valid until May 1 – so hurry over to bornpretty and pick up a great deal!!

Worldwide shipping is available!
Born Pretty also offer wholesale prices on all their products and if you spend over $200, EMS shipping is free!! 


Also for all you fans of extravagant nails, these gold electroplated tips are only $0.50 until 30/03!! 

Scarves, Deco and Sailors?!

The ‘Scarf’ Trend
A few examples from April issue of Happie Nuts.
I’m sure you have all noticed or at least heard by now about the current Scarf boom in Gal. If not then definitely check out this post by Mitsu – everything you need to know, and a little how-to for those a bit unsure of what to do.
Scarves can be seen in most current issues of Gal magazines, whether worn on the head or as an accessory – although the head scarf seems to be most popular right now.
And all of the models are working it; Popteen’s Wei Son & Yui Kanno, Momoeri, Romihi is stocking up on Bandanas from SBY, and it’s also a fave with Nori & Tae.
I had a go this past week, and here are a few pics;
Left; Regular scarf made into a bow
Right; Ready-made lace bow, wrapped around my bun (thanks Samispo0n).
The ‘hippie’ look that a few models seem to be working.
And to prove that even animals can work the current Gal trend…
My puppy – Sam XD
What do you think of the current Scarf trend?

Deco-Den
You may remember one of my fledgling posts about deco-ing my cellphone, here.
Well I had a long train journey back to uni this weekend, so I thought I’d give it a go – yes on the train, haha. No I’m not crazy, I cheated and used a glue sheet on the phone, so it was a lot easier.
I used pink gems and pearls to accent the pink and creme purikura of my boyf and I…
What do you think?

Finally, some fancy dress…
I went out to a club night with some friends last week, and the theme was ‘Nautical Night’ – pirates and sailors. I originally wanted to be a pirate but in the end opted for a Sailor theme.
How is this related to Gal, I hear you ask.
Well I’m sure that Gal’s love to do fancy dress as much as everyone else (possible idea for a post?!), and I tried out some new hair/make-up so I thought I’d show you.
17 Blue eye dazzle dust (poor lighting doesn’t show it off),
Dolly wink liquid & pencil eyeliner,
Accent lashes.
I curled my hair and placed it into bunches, unfortunately my hair is very thin, as you can see in the pics above. That was my hair teased!! My hair dresser keeps telling me to stop straightening, backcombing and dying my hair etc. I would opt for extensions but that wouldn’t offer my hair much relief either, haha.
Does anyone have any tips on thickening your hair – with products/vitamins etc?